How To Make A Great Drywall Finish
Drywall installation requires some skill and patience, but it can also be a rewarding DIY project. One of the most important steps in drywall installation is finishing, which involves applying joint compound and tape to cover the seams and corners of the panels, as well as sanding and priming the surface for painting. A great drywall finish can make a big difference in the appearance and durability of your walls. Here are some tips on how to make a great drywall finish:
- Choose the right tools and materials.
You will need a utility knife, a drywall saw, a tape measure, a level, a hammer, a drill, screws or nails, drywall panels, joint compound, paper or mesh tape, a taping knife, a mud pan, a sanding block or pole sander, sandpaper, primer and paint. Make sure you have enough of each item for your project and that they are in good condition.
- Cut and hang the drywall panels.
Measure and mark the dimensions of your walls and ceilings on the drywall panels and cut them with a utility knife or a drywall saw. Leave a small gap (about 1/8 inch) between the panels and the floor and ceiling to allow for expansion and contraction. Hang the panels horizontally or vertically on the studs with screws or nails, making sure they are flush and aligned. Use as few joints as possible to reduce the amount of finishing work.
- Apply the joint compound and tape.
Mix the joint compound according to the manufacturer's instructions and apply it over the joints and corners of the panels with a taping knife. Press the paper or mesh tape into the wet compound and smooth it with the knife. Remove any excess compound and air bubbles. Let the compound dry completely before applying another coat. Repeat this process until you have three or four thin coats of compound over each joint and corner. Feather the edges of each coat to blend them with the surrounding surface.
- Sand and prime the surface.
Once the joint compound is dry and hard, sand it lightly with a sanding block or pole sander and fine-grit sandpaper until it is smooth and even. Wipe off any dust with a damp cloth or sponge. Apply a coat of primer over the entire surface to seal it and prepare it for painting. Let the primer dry completely before painting.
- Paint the surface.
Choose a paint color and finish that suits your preference and style. Use a roller or brush to apply one or two coats of paint over the primed surface, following the manufacturer's directions. Let each coat dry thoroughly before applying another one.
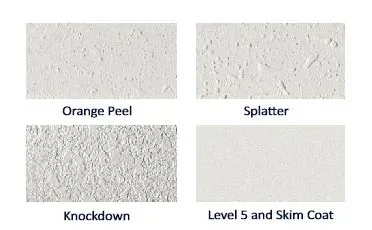
- OK Let's go Deeper! How about achieving a Level 5 finish?
A level 5 finish is the highest quality finish that can be applied to drywall. It is smooth, even, and free of imperfections. To create a level 5 finish, you will need the following materials:
- Drywall joint compound
- A drywall knife
- A sanding block
- A water spray bottle
- A dust mask
- Safety glasses
Instructions:
- Prepare the drywall. Make sure that the drywall is clean, dry, and free of any imperfections. If there are any holes or cracks, fill them with joint compound.
- Apply the first coat of joint compound. Use a drywall knife to apply a thin coat of joint compound to the entire surface of the drywall. Let the first coat dry completely.
- Apply the second coat of joint compound. Use a drywall knife to apply a second coat of joint compound to the entire surface of the drywall. Let the second coat dry completely.
- Sand the drywall. Use a sanding block to sand the drywall until it is smooth and even.
- Apply a third coat of joint compound, if necessary. If there are any imperfections in the drywall, apply a third coat of joint compound and sand again.
- Wipe away any dust. Use a damp cloth to wipe away any dust from the drywall.
- Apply a primer and paint. Once the drywall is dry, apply a primer and paint to the surface.
Creating a level 5 finish takes time and patience, but it is worth it for the smooth, even finish that you will get. With a little practice, you will be able to create a level 5 finish that will rival any professional.
Here are some additional tips for creating a level 5 finish:
- Use a high-quality joint compound.
- Apply the joint compound in thin coats.
- Let each coat dry completely before applying the next coat.
- Sand the drywall thoroughly between coats.
- Use a primer that is designed for use with drywall.
- Apply two coats of paint.
Need help with any of the projects we mentioned? Give us a call! We are always here to help.