
Drywall Texture Tutorials
Sometimes you need expert advice because you are somewhat skilled and can handle projects on your own with just a little guidance. Drywall texturing can be tricky and so we are here to help!
Of course, when you run into trouble, we're ready and able to work on your project as well. You can book an estimate with us here or call us anytime at 916-899-6006.
General drywall texturing techniques
Drywall texturing is a great way to add visual interest and depth to your walls. With a little bit of effort, you can create a variety of textures that range from subtle to bold. The key to creating drywall texturing is to use the right tools and techniques.
The first step in creating drywall texturing is to prepare your walls. Make sure that the surface is clean, dry, and free of any defects. Next, apply a coat of primer to the walls to help the texture adhere better. Once the primer is dry, you can start applying the texture.
There are several different tools that you can use to create drywall texturing, including rollers, brushes, and trowels. The most common technique is to use a roller to apply the texture. Rollers come in a variety of patterns and sizes, so you can choose one that suits your desired texture. Alternatively, you can use a brush or trowel to create a more textured look. Once you've applied the texture, let it dry completely before painting.
When painting over textured drywall, use a roller with a medium nap to ensure that you get full coverage. Be sure to use enough paint to fill in all of the crevices and indentations created by the texture. With a little bit of practice and experimentation, you can create a variety of drywall textures that will add depth and interest to your walls.
Drywall Texture Matching
Matching drywall texturing can be a challenging task, but it's essential if you want your walls to look seamless and cohesive. Whether you're patching a small area or trying to match a large section of wall, there are several techniques you can use to achieve a consistent texture.
The first step in matching drywall texturing is to identify the type of texture that you're trying to match. Common textures include knockdown, popcorn, and orange peel. Once you've identified the texture, you can begin to replicate it. One technique is to use a spray can of texture, which can be found at most hardware stores. Test the texture on a scrap piece of drywall before applying it to the wall to ensure that it matches the existing texture.
Another technique is to create your own texture using joint compound and a trowel. Mix the joint compound with water until it's the consistency of pancake batter. Apply the joint compound to the wall using a trowel, and then use a texture roller or brush to create the desired texture. Let the joint compound dry completely before painting.
If you're having trouble matching the texture, consider hiring a professional drywall contractor. They have the tools and expertise to replicate even the most intricate textures, ensuring that your walls look seamless and professional. With a little bit of patience and effort, you can match drywall texturing and restore your walls to their former glory.
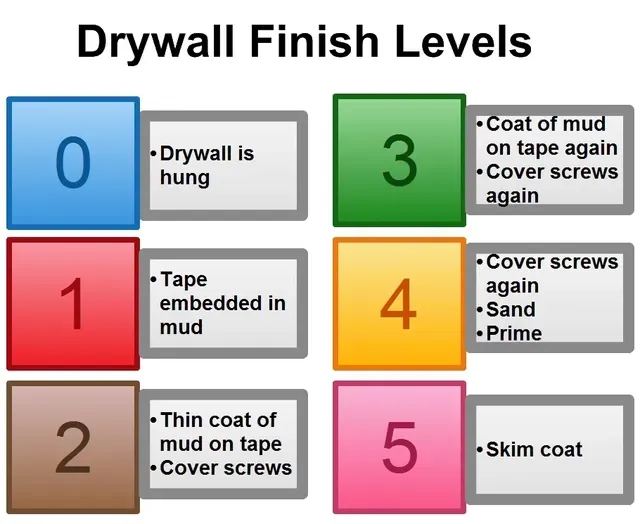
Achieving Level 5 Drywall Finish
Level 5 drywall finish is known as the highest quality finish that can be applied to drywall. It is smooth, even, and free of imperfections. To create a level 5 finish, you will need the to do the following:
Instructions:
- Prepare the drywall. Make sure that the drywall is clean, dry, and free of any imperfections. If there are any holes or cracks, fill them with joint compound.
- Apply the first coat of joint compound. Use a drywall knife to apply a thin coat of joint compound to the entire surface of the drywall. Let the first coat dry completely.
- Apply the second coat of joint compound. Use a drywall knife to apply a second coat of joint compound to the entire surface of the drywall. Let the second coat dry completely.
- Sand the drywall. Use a sanding block to sand the drywall until it is smooth and even.
- Apply a third coat of joint compound, if necessary. If there are any imperfections in the drywall, apply a third coat of joint compound and sand again.
- Wipe away any dust. Use a damp cloth to wipe away any dust from the drywall.
- Apply a primer and paint. Once the drywall is dry, apply a primer and paint to the surface.
Creating a level 5 finish takes time and patience, but it is worth it for the smooth, even finish that you will get.
With a little practice, you will be able to create a level 5 finish that will rival any professional.
Here are some additional tips for creating a level 5 finish:
- Use a high-quality joint compound.
- Apply the joint compound in thin coats.
- Let each coat dry completely before applying the next coat.
- Sand the drywall thoroughly between coats.
- Use a primer that is designed for use with drywall.
- Apply two coats of paint.
Having Trouble with a Level 5 Finish?
Give us a call!
916-899-6006
and we'll take care of the rest!